My love for outdoor adventure is no secret, and while I certainly haven’t hiked every trail in the United States, I’ve spent enough time on the trail to know which experiences truly linger.
This isn’t meant to be a definitive list of the best hikes in the US, but rather a collection of the ones that have stayed with me long after I got home. The hikes I still think about, the ones that come rushing back the moment I scroll through old photos.
And yes. . . I know there’s not anything east of the Rockies included. I’m sorry! If you’ve got an East Coast trail that you think should make the cut, I’m all ears.
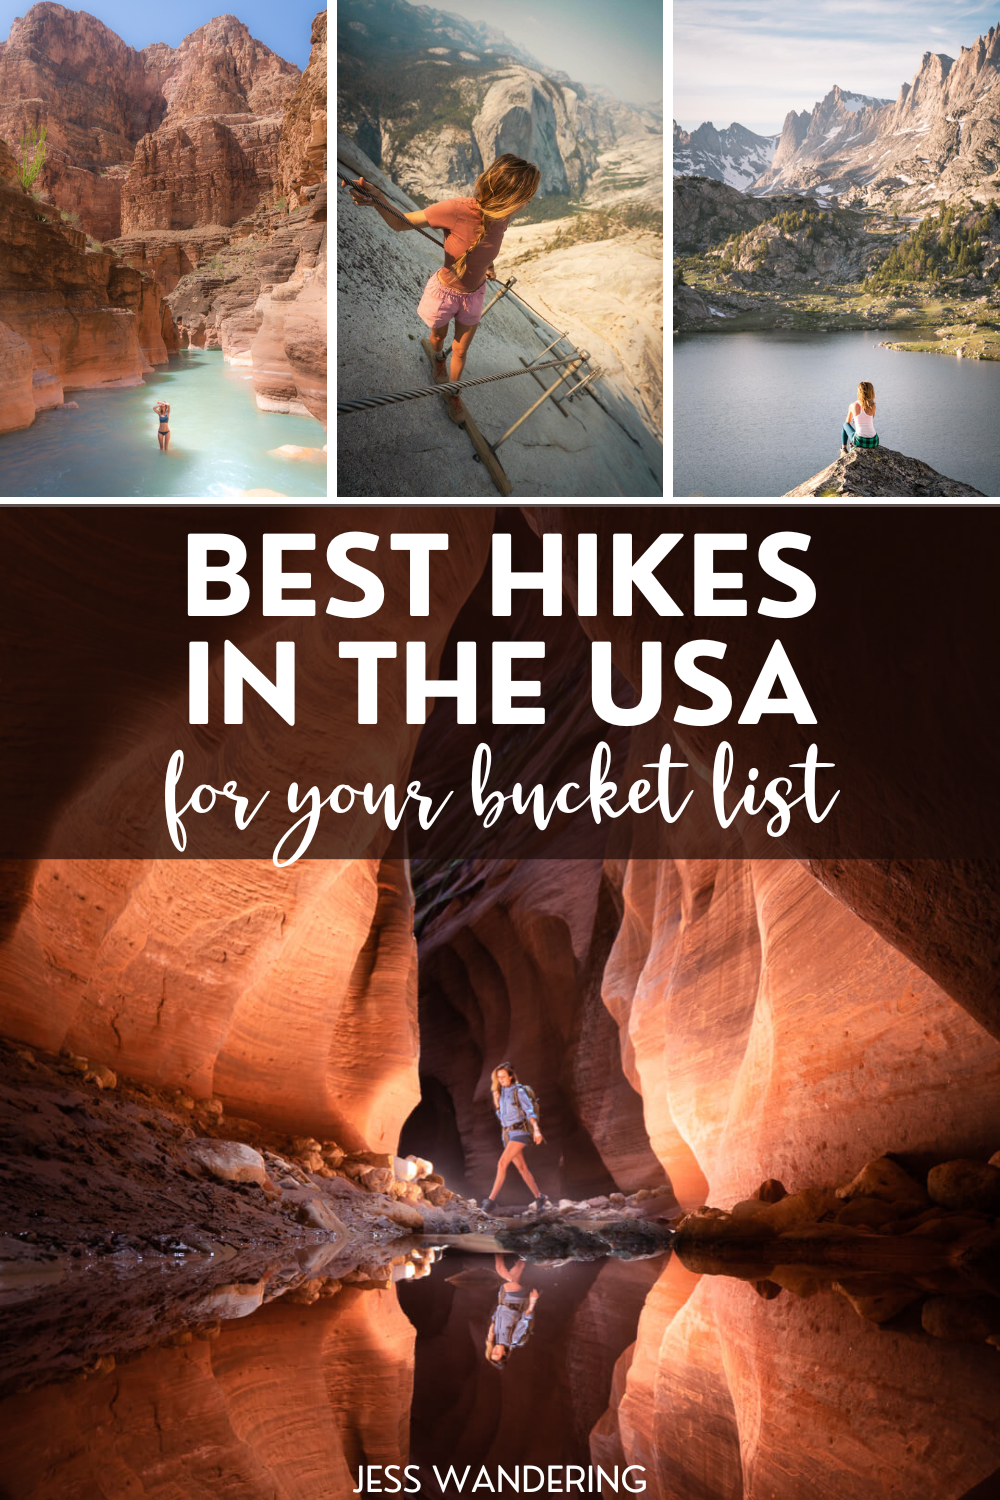
The Best Bucket List US Hiking Trails
The United States is home to some of the best hikes in the world, from iconic national park trails to remote routes that feel far removed from civilization. Over the years, I’ve hiked across deserts, alpine ridgelines, slot canyons, and coastal cliffs, and these experiences have shaped how I think about what makes a hike truly memorable. This list isn’t about checking boxes or chasing popularity. It’s about the best hikes in the US based on experience, scenery, effort, and how they actually feel on the trail.
Whether you’re looking for classic bucket-list hikes, challenging routes that push you physically, or trails that reward you with unforgettable views, these are the hikes that stand out. For each one, I’ve included what makes it special, what to expect on the trail, and the logistics you’ll want to know before you go, so you can decide which hikes belong on your own list.
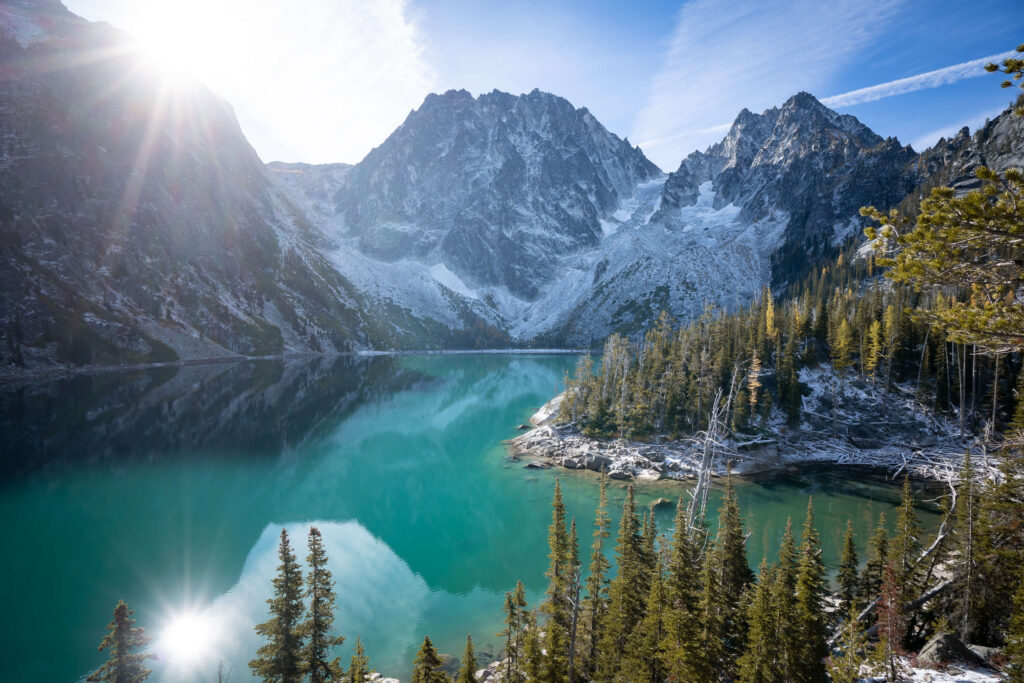
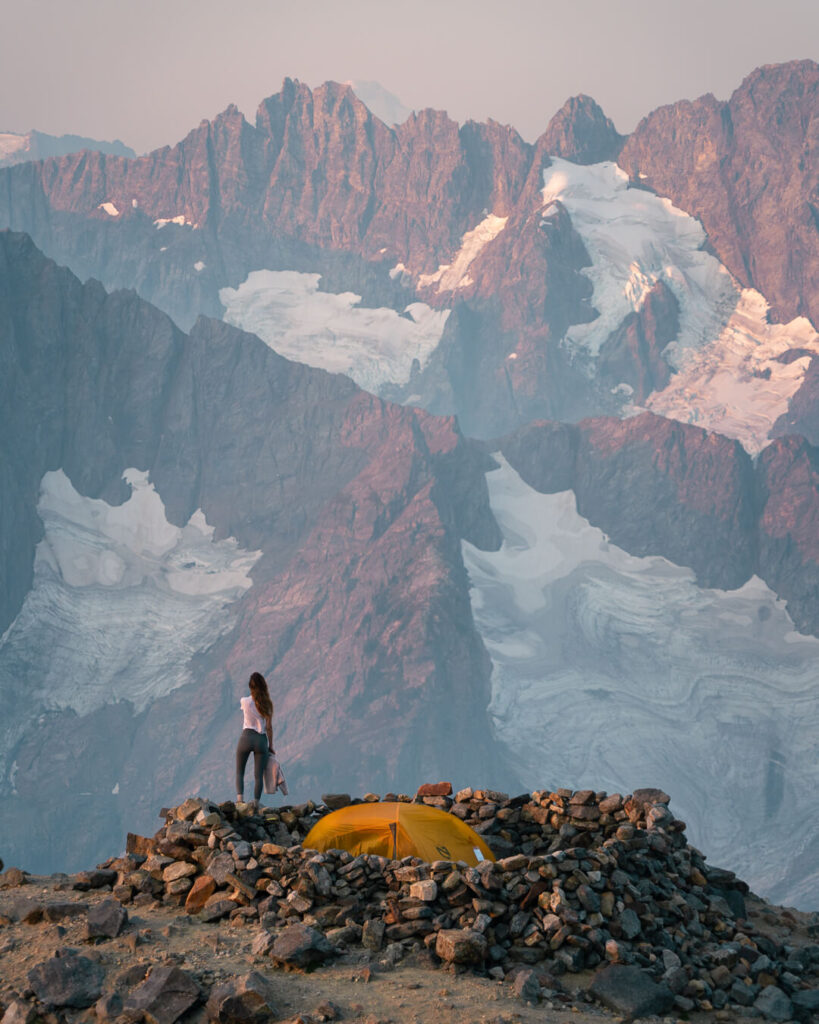
Mineral King Loop – Sequoia National Park, California
Why This Hike Is Special
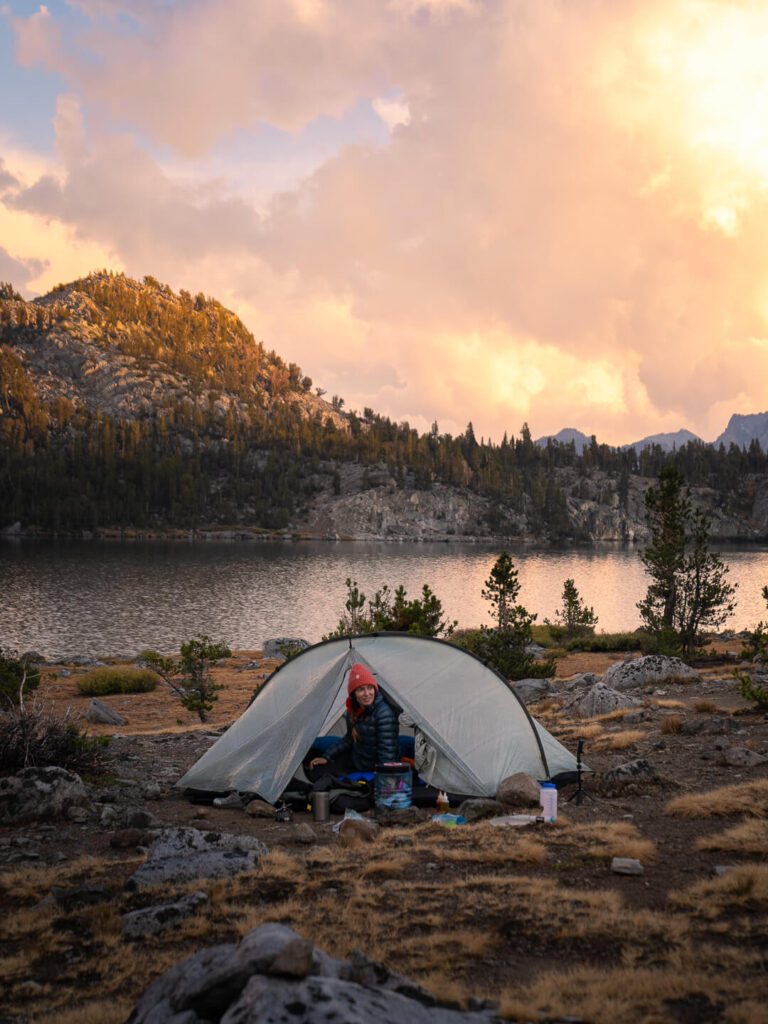
What started as a goal to just do an out-and-back trail to Precipice Lake morphed into a four-day loop hike through the Sierras, taking in stunning alpine lakes surrounded by wildflowers, camping in old-growth redwood groves, and towering peaks with dramatic valley views.
Of all the hikes I’ve done Mineral Kind Loop stands out for it’s sheer diversity of landscapes. It’s one of the few places where you can sleep under giant redwoods one night and the shores of a pristine alpine lake the next?
The Experience
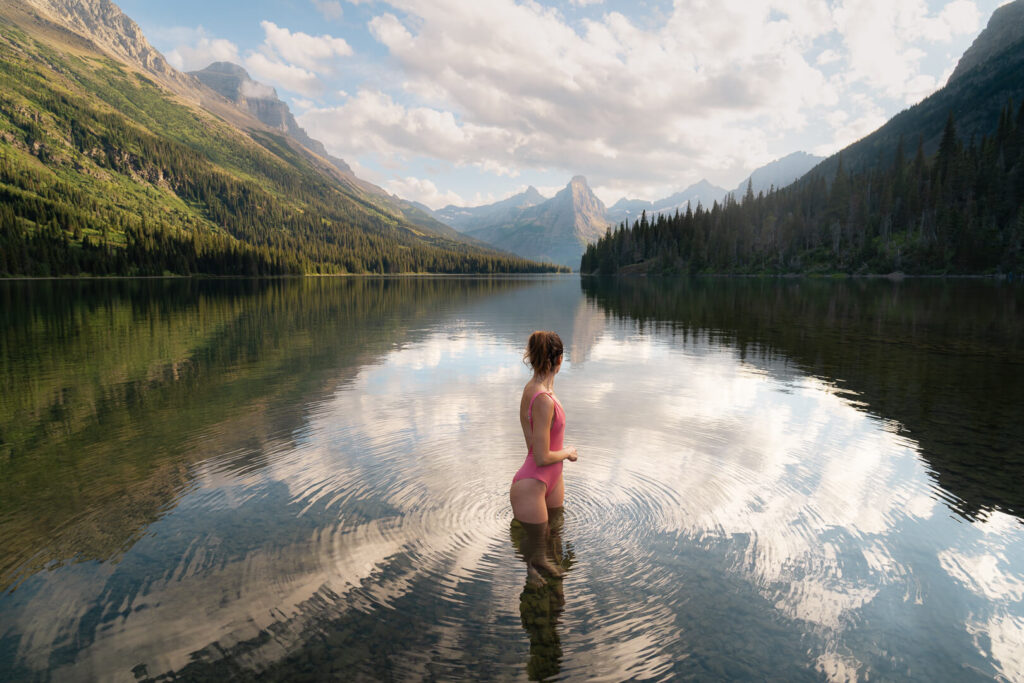
With over 11,000 feet of elevation gain and loss, this isn’t an easy trail, and the High Sierra Trail, particularly between Hamilton Lakes and Precipice Lake, were some of the most mentally and physically challenging miles of hiking I’ve done in the US. But to see the reflection at Precipice Lake (and swim in it after a long day on the trail!) made it all worth it.
What You Need to Know Before You Go
- Distance: 47 miles
- Elevation gain: 11,000 feet
- Time Needed: 4-6 Days
- Permits: A backcountry wilderness permit is required for the Mineral King Loop. Permits are issued by Sequoia & Kings Canyon National Parks and are quota-based during peak season. Find information about quotes and permit stations here
- Best season: Mid July through September. Outside this range you’ll want to check for snow.
Logistics & Planning Tips
Bears and Food Storage: Bear canisters are required in the Mineral King area. Bears here are known to be persistent, and proper food storage is non-negotiable. There are also marmots in the area that are infamous for chewing hoses and car parts, so use the marmot covers provided at trailheads.
Route Direction: The loop can be done clockwise or counterclockwise. Many hikers prefer clockwise, tackling the higher passes earlier when legs are fresh. Either way, expect sustained elevation gain and multiple high passes.
Who This Hike Is Best For
This is a strenuous multi-day hike with significant elevation gain and loss. Distances aren’t extreme, but the cumulative effort adds up. This loop is best for experienced backpackers.
Read my full Mineral King Loop guide here.
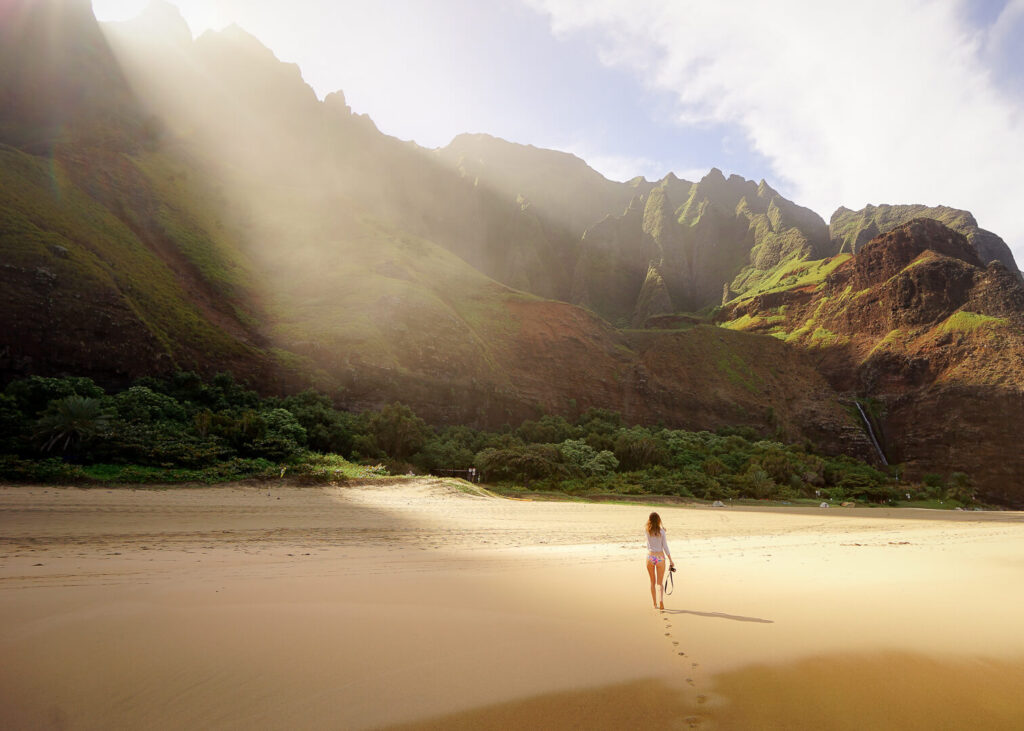
Kalalau Trail – Na Pali Coast, Hawaii
Why This Hike Is Special
The Kalalau Trail is one of the most dramatic coastal hikes in the world. Carved into the cliffs of Kauai’s Na Pali Coast, it moves between sheer sea cliffs, narrow ridgelines, lush valleys, and remote beaches that feel completely disconnected from the modern world. It’s visually stunning, physically demanding, and emotionally memorable in a way few hikes are.
The Experience
The trail begins in dense tropical forest and quickly transitions into exposed cliffside traverses with the Pacific crashing below. You move between jungle, red dirt ridges, waterfalls, river crossings, and open ocean views. Some sections feel calm and meditative, others demand full focus.
What You Need to Know Before You Go
- Distance: 22 Miles RT
- Elevation gain: ~5,000 feet total
- Time Needed: 2 Days. But I’d suggest longer to allow for more time on Kalalau.
- Permits: Required for overnight camping beyond Hanakapiai. Find them here, released 90 days in advance.
- Best Season: Summer (May–September)
Logistics & Planning Tips
The trail runs from Ke’e Beach to Kalalau Beach along the iconic Na Pali Coast. The rugged, untouched nature here is part of what makes this a must-do hiking trail in the US.
Often called “one of the most dangerous trails in the United States”, Kalalau Trail isn’t necessarily as dangerous as this suggests, but with many water crossings, dangerous swells, narrow trails, and life-threatening riptides, there are plenty of dangers you’ll need to be prepared for before undertaking this trail.
Who This Hike Is Best For
Thankfully, while this is one of the best day hikes in the US, there is also the Six-Mile Campsite, allowing hikers to stop halfway, take a slower pace and enjoy the views. I’ve done it this way, and I’ve also hiked all the way to Kalalau in one push.
If you aren’t up for the full hike, you can just do the section leading to Hanakapi’ai Beach. This is still a challenging hike, especially when the trail is muddy after the rain, but it makes it a hike you can easily complete in a morning or afternoon with some time at the beach.
Read my full Kalalau Trail experience here.
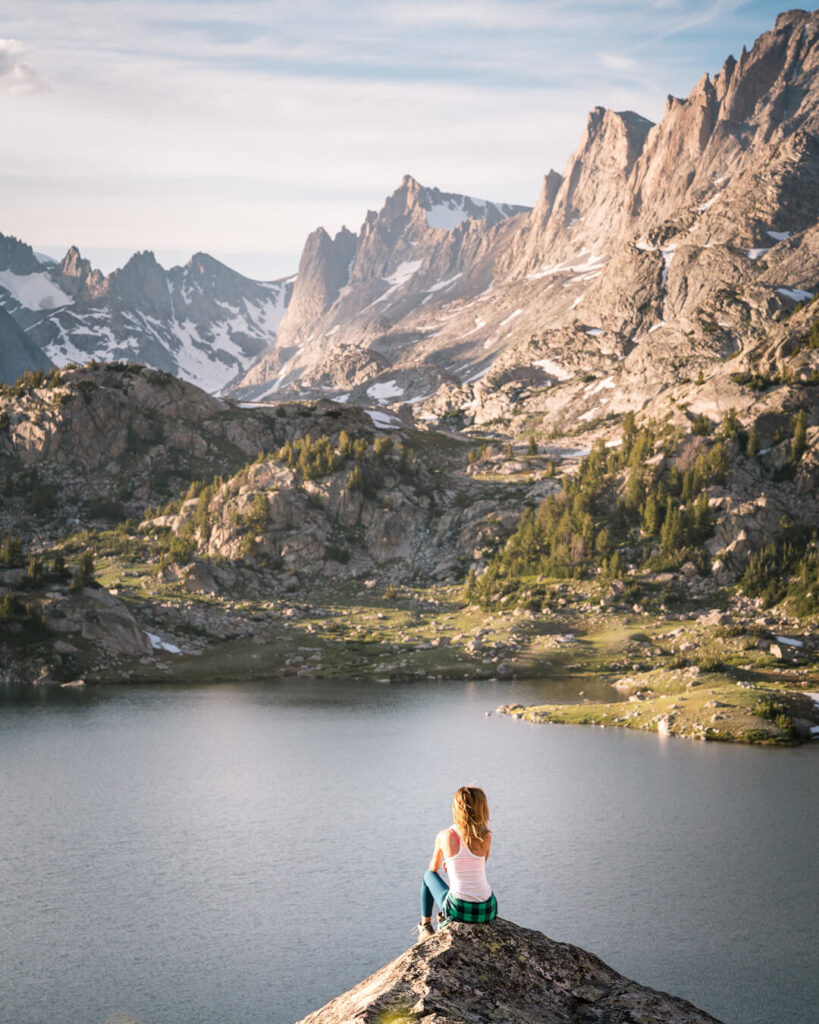
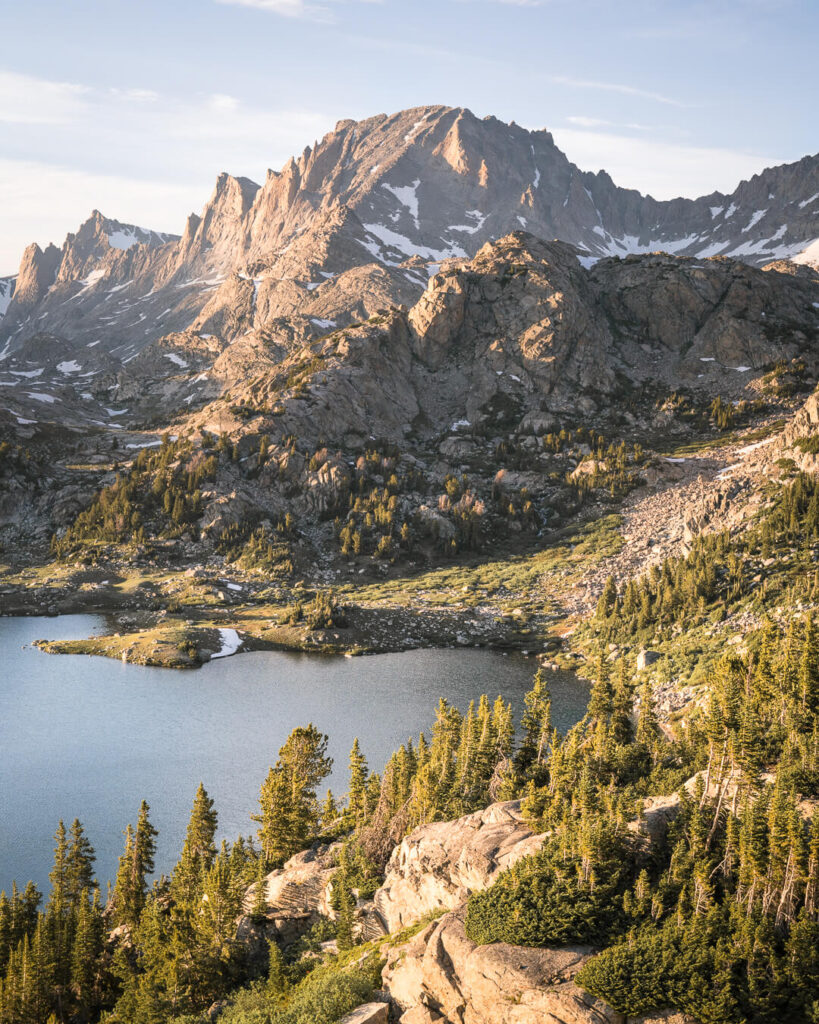
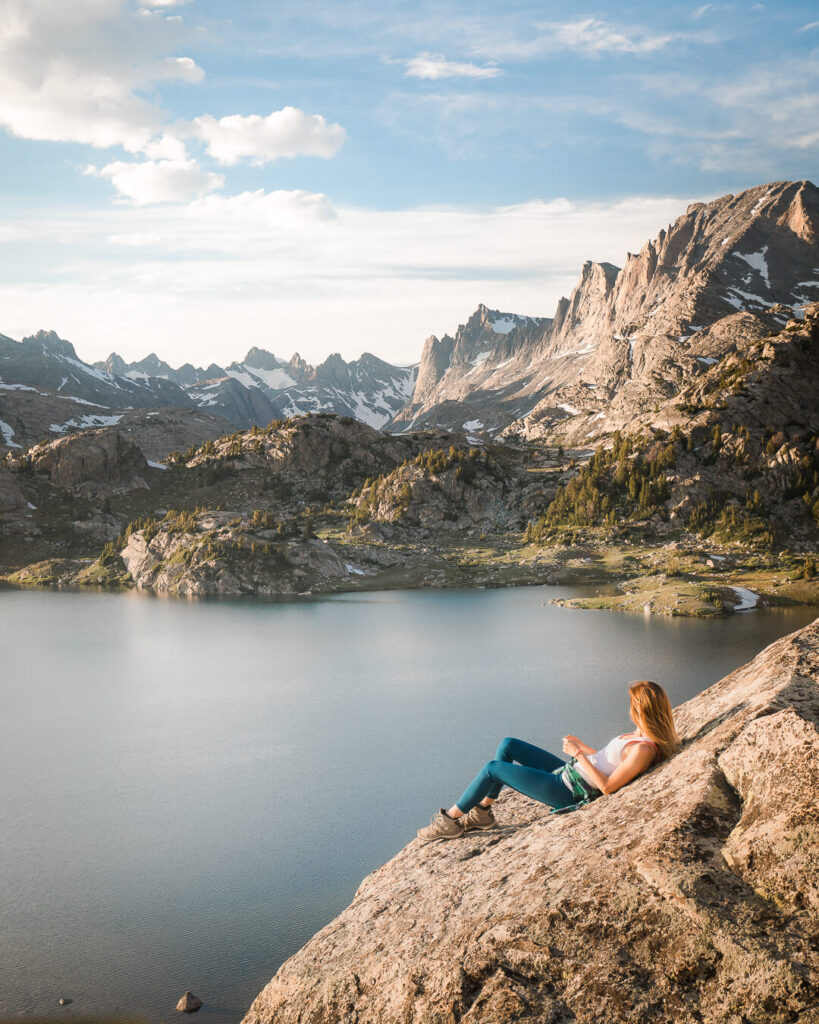
Island Lake – Bridger Wilderness, Wyoming
Why This Hike Is Special
What makes this hike stand out is how quickly it immerses you in classic Wind River terrain. Wide valleys, clear streams, and jagged ridgelines surround you almost the entire way, and Island Lake itself feels like a natural centerpiece tucked into a massive alpine basin.
The Experience
The hike begins at the Elkhart Park Trailhead, one of the most popular access points to the Bridger Wilderness. From the start, the trail is well-defined and gradually climbs through open forest and meadows, with views opening up more and more as you go.
As you approach Island Lake, the landscape becomes distinctly alpine. The trees thin out, the air cools, and the surrounding peaks start to dominate the skyline. Island Lake sits in a broad basin surrounded by granite walls and smaller tarns, and it feels distinctly wild.
What You Need to Know Before You Go
- Distance: 24 miles RT
- Elevation gain: Approximately 2,500 feet (but there’s a lot of up and down)
- Permits: No permit required for day hiking or backpacking (self-register at trailhead)
- Best season: July through September, although mosquitos can be horrendous early season
Logistics & Planning Tips
Trailhead Access: Start at the Elkhart Park Trailhead, which is accessible by a paved road near Pinedale, Wyoming. Parking is ample, but this is a popular trailhead, so arriving early is smart during peak season.
Wildlife: This is grizzly bear country. Carry bear spray, know how to use it, and follow proper food storage practices if backpacking.
Camping: Dispersed camping is allowed near the lake, but campsites can fill quickly. Follow Leave No Trace principles and camp away from the shoreline.
Who This Hike Is Best For
Island Lake is ideal for hikers looking for a classic alpine experience without committing to a highly technical or remote route. It’s great for strong day hikers and backpackers who want big scenery with relatively straightforward logistics.
It’s not the best choice if you’re looking for solitude during peak season, but it’s an excellent option if you want to experience the Wind Rivers for the first time.
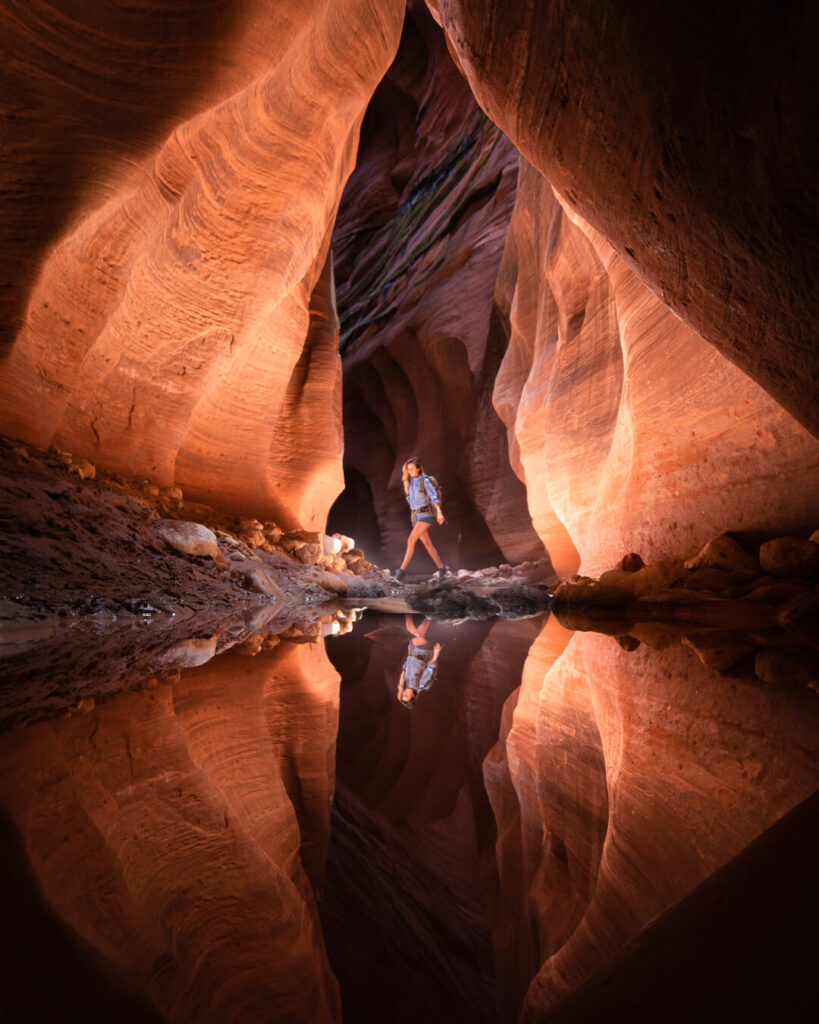
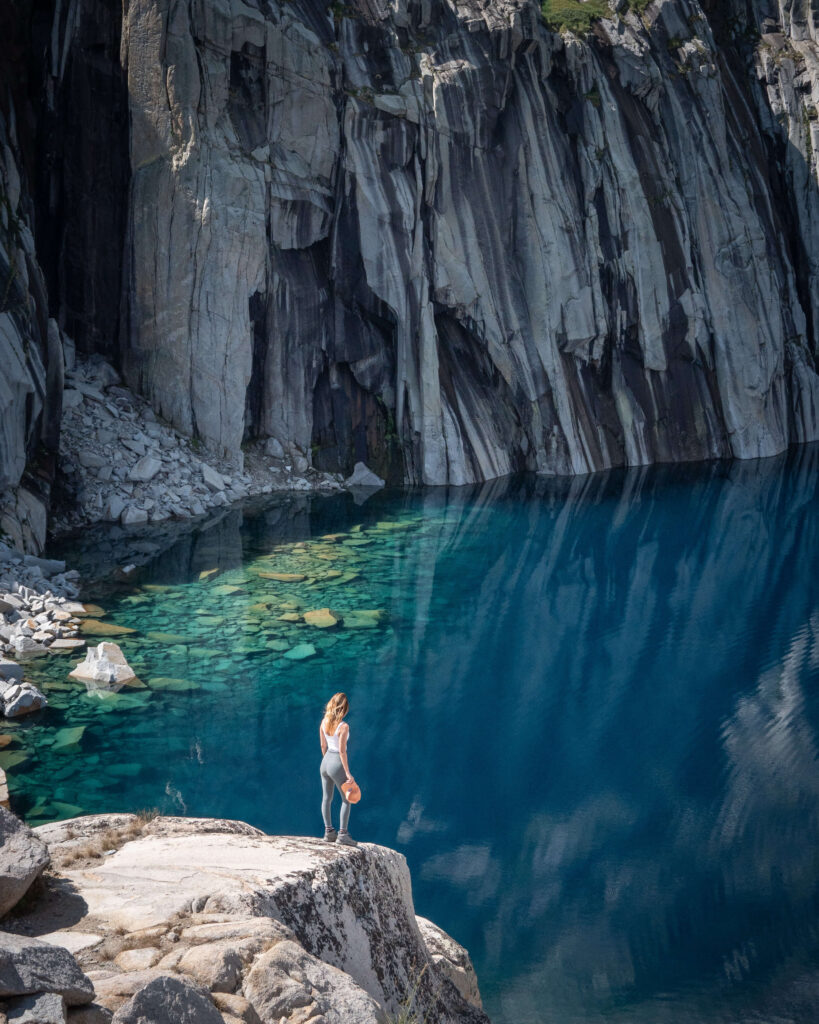
Buckskin Gulch – Paria Canyon-Vermilion Cliffs Wilderness, Utah
Why This Hike Is Special
Buckskin Gulch is one of the longest and deepest slot canyons in the world, and hiking through it feels completely different from almost any other trail in the US. There are no sweeping overlooks or distant views. Instead, the experience is immersive and enclosed, with towering sandstone walls that close in tighter and tighter as you move forward. When the sun shines in, the glow is pure magic. There’s simply nothing like it.
The Experience
Most hikes into Buckskin Gulch start at the Wire Pass Trailhead, which provides the most direct access into the slot canyon. The approach is sandy and open at first, then quickly narrows as you enter the canyon.
Once inside, the walls rise dramatically, in places narrowing to just a few feet wide while stretching hundreds of feet overhead. The trail itself is mostly flat, but don’t let that fool you. Progress can be slow due to deep sand, mud, standing water, and obstacles left behind by flash floods.
Depending on conditions, you may encounter pools of cold, stagnant water that require wading, sometimes waist-deep or deeper. Light filters in from above in thin beams, and the temperature inside the canyon can feel significantly cooler than the surrounding desert.
What You Need to Know Before You Go
- Distance: Up to 23 miles one-way if continuing through Paria Canyon. Shorter out-and-back options are common.
- Elevation gain: Minimal
- Permits: Required for day hikes and overnight trips. For overnight staying in the canyon, you need a backcountry permit for the Paris Canyon-Vermilion Cliffs Wilderness. To protect the canyon, there are only 20 per day and you need to buy them in advance here.
- Best season: Spring and Fall
- Time Needed: Half day to full day for an out-and-back, 1–2 days for through-hikes
Logistics & Planning Tips
Flash flooding is the biggest risk in Buckskin Gulch. Even storms far away can send water rushing through the canyon. Never enter if rain is forecast anywhere in the drainage.
The logistics for Buckskin Gulch are largely dependent on whether you are hiking it as a through hike or out an back. If you do the entire though hike you’ll need to arrange a shuttle between trailheads. You can do this if you have access to two vehicles, or there are also services in the area you can hire.
Regardless of the length of your hike, expect wet feet. Waterproof footwear or shoes that can handle prolonged immersion are important. Trekking poles can help with balance in mud and water.
Who This Hike Is Best For
Buckskin Gulch is a great hike for anyone that doesn’t mind getting wet and has good risk management skills.
I’ve done this hike as a short day hike, simply going a few miles into the canyon before turning around and heading back to the car. I’ve also done it as a one night backpacking trip from Wire Pass to White House (23 miles). I also missed the confluence once and hiked all the way from Wire Pass to Lees Ferry (42 miles). And after all that, I can confidently say that you really can’t go wrong! Even if you only have time for a short day hike you’ll get to experience the magic of this location!
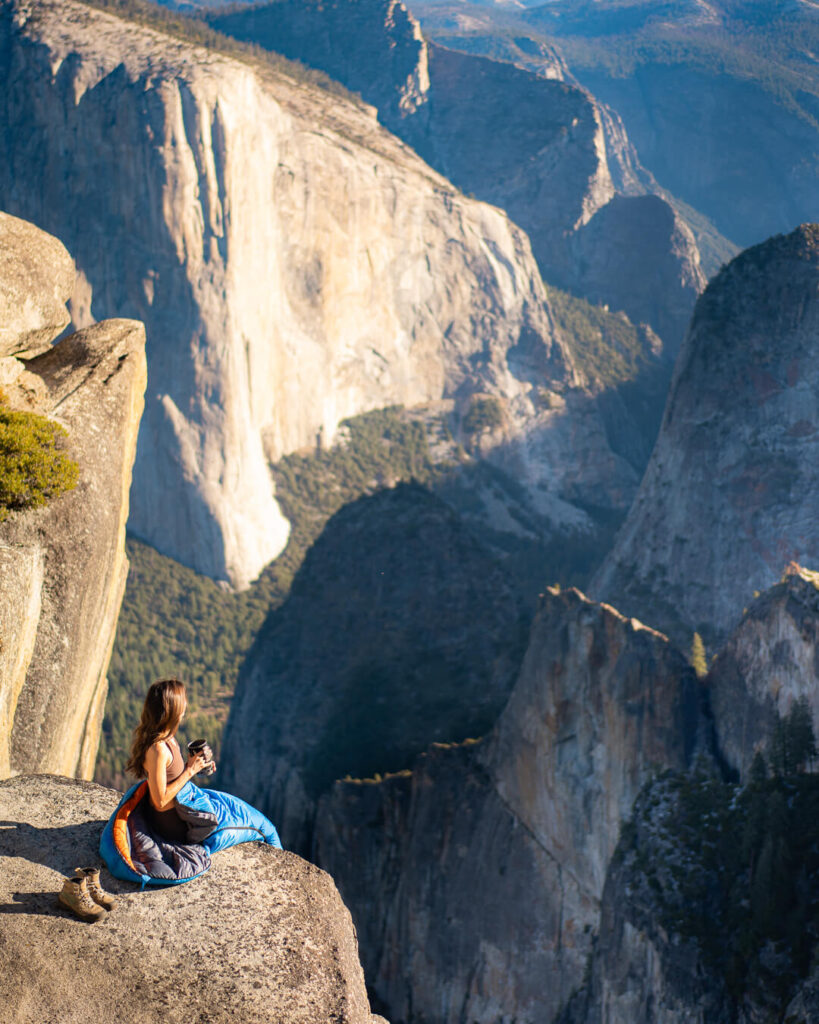
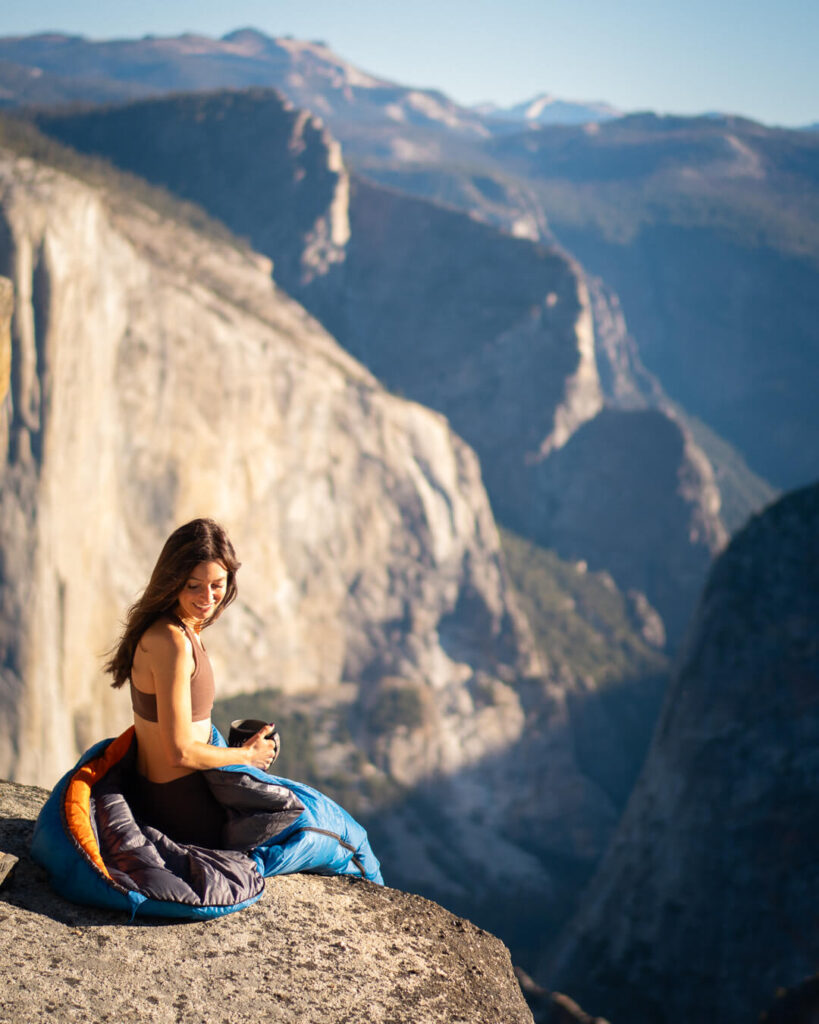
Pohono Trail – Yosemite National Park, California
Why This Hike Is Special
The Pohono Trail is one of the best ways to experience Yosemite from above the crowds. Running along the south rim of Yosemite Valley, it links together some of the park’s most iconic viewpoints while still feeling surprisingly quiet and expansive once you get a few miles in.
What makes this trail special is the perspective. Instead of looking up at Yosemite’s cliffs, you’re walking along them. The views stretch across the entire valley, and the scale of the landscape feels constant rather than concentrated in one moment.
And becaues you’re already up on the rim, there’s no major elevation gain!
The Experience
The Pohono Trail traditionally runs between Tunnel View and Glacier Point, though many people hike shorter sections as out-and-backs or with a shuttle. From the start, the trail climbs steadily through forest before opening up to exposed viewpoints like Inspiration Point and Crocker Point.
The terrain alternates between shaded forest and open granite slabs, with long stretches of rolling trail rather than sustained climbs. I love how many of Yosemite’s iconic landscapes make appearances on Pahono Trail. One minute you’re tucked into the trees, the next you’re standing on the edge of the valley with El Capitan, Yosemite Falls, and Half Dome spread out in front of you.
What You Need to Know Before You Go
- Distance: About 13 miles one way (Tunnel View to Glacier Point)
- Elevation gain: 3,700 feet
- Permits: No permit required for day hiking. Wilderness permit required for overnight trips
- Best Season: Late spring through fall, depending on snow conditions
- Time Needed: Full day for day hike, 2 days for an overnight backpacking trip
Logistics & Planning Tips
Common starting points include Tunnel View, Glacier Point, and Taft Point Road. Shuttle logistics can make this trail much more manageable if doing it one way. Both times I’ve done this trip as an overnight backpack, leaving my car down in the valley and hitch hiking up to Glacier Point.
Who This Hike Is Best For
The Pohono Trail is ideal for strong day hikers looking for big Yosemite views without a steep, sustained climb. It also makes a great beginner backpacking trip thanks to its well-maintained trail, rolling terrain, and straightforward navigation.
Get all of my favorite camping spots in Yosemite here.

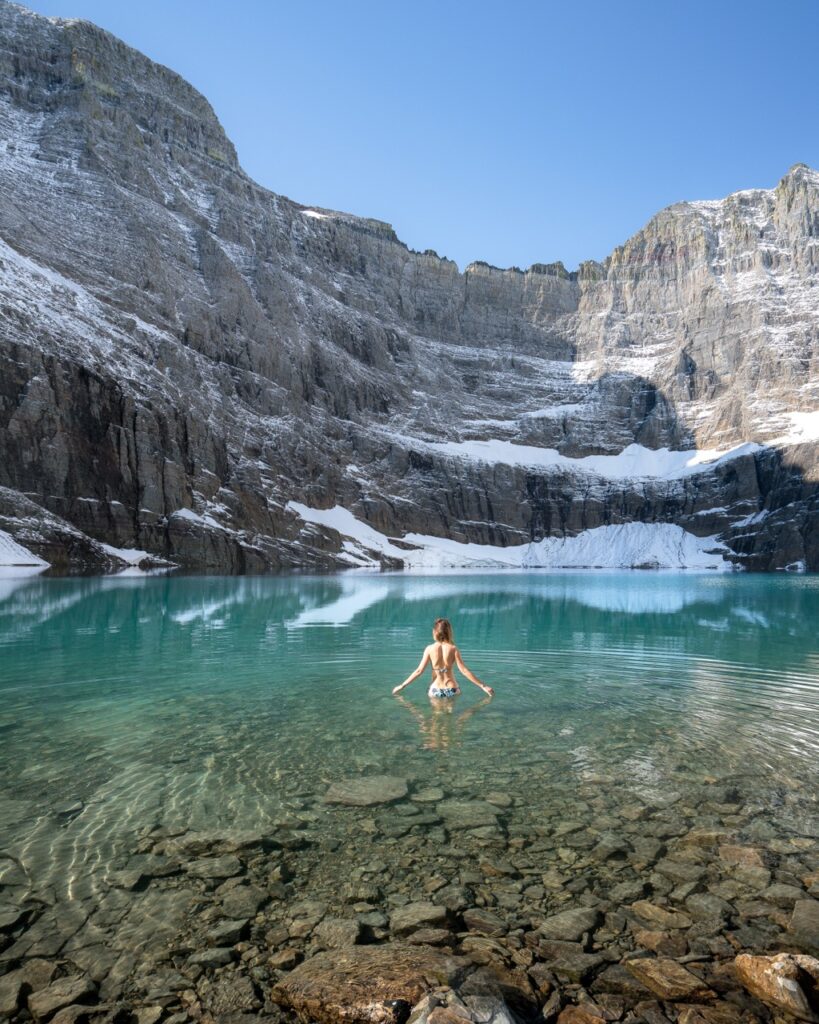
Ice Lakes Trail, San Juan National Forest, Colorado
Why This Hike Is Special
Ice Lakes Trail is famous for a reason. The color of the water doesn’t feel real, especially on a clear day when the lakes glow bright turquoise against jagged San Juan peaks. It’s one of the most visually striking alpine hikes in Colorado, and when conditions are right, it delivers that wow factor in a big way.
What sets this hike apart is how quickly the scenery ramps up. From wildflowers to waterfalls to alpine basins, it feels like a highlight reel of Colorado packed into a single trail.
The Experience
The hike starts in dense forest and immediately begins climbing. The elevation gain is steady and noticeable from the start, with long switchbacks that don’t offer much relief. You’ll definitly feel it if you’re coming from sea level! As you gain elevation, the forest opens into meadows filled with wildflowers in mid-summer, followed by waterfalls and increasingly open views.
The final stretch climbs into an alpine basin where Lower and Upper Ice Lakes sit beneath rugged peaks. The contrast between the neon-blue water, gray rock, and green slopes is wild!
Because of its popularity, expect company, especially on weekends and during wildflower season. Early starts make a big difference, both for crowds and lighting. Even better, consider backpacking so that you can enjoy the lake before and after the day hikers leave.
What You Need to Know Before You Go
- Distance: About 7 miles round trip to Ice Lakes
- Elevation gain: Approximately 2,500 feet
- Permits: No permits required. . . yet
- Best season: Late June through September, depending on snowpack
Logistics & Planning Tips
The trailhead is located near Silverton, Colorado, in the San Juan National Forest. The final road is dirt and can be rough in places, but is usually passable for most vehicles in dry conditions.
Who This Hike Is Best For
Ice Lakes Trail is best for strong day hikers who are comfortable with sustained elevation gain and high altitude. It’s a great choice if you’re looking for dramatic alpine scenery in a relatively short distance, but it’s not ideal if you’re hoping for solitude or an easy introduction to hiking.
Distance: 7 miles
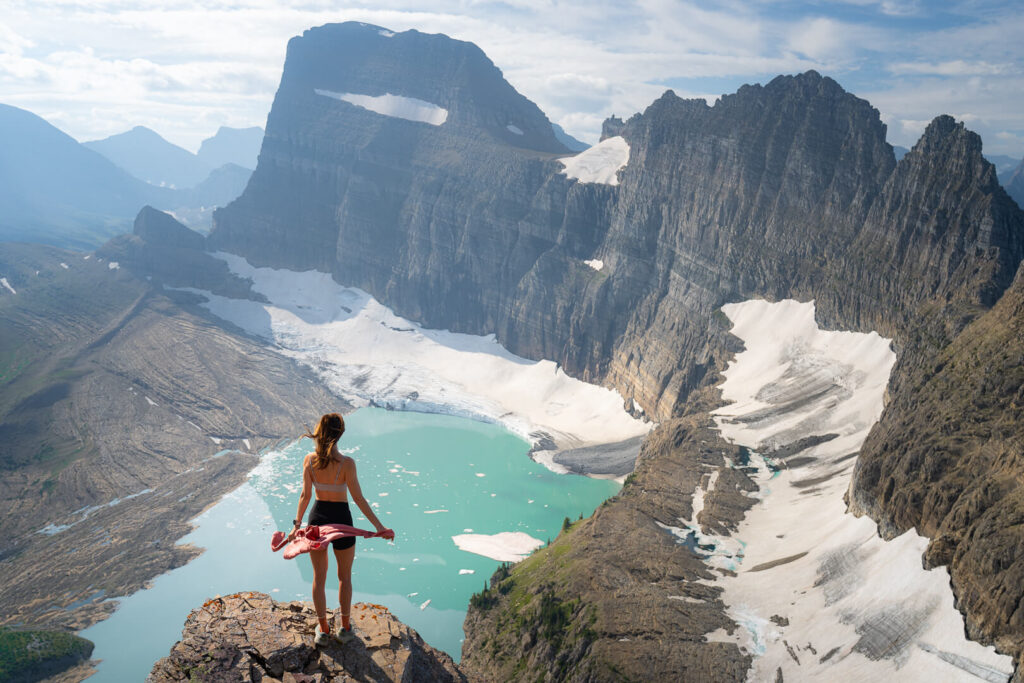
North Circle Loop – Glacier National Park, Montana
Why This Hike Is Special
The North Circle Loop is one of the most complete backpacking routes in Glacier National Park. It strings together high mountain passes, turquoise lakes, hanging valleys, and some of the park’s most dramatic backcountry scenery into one continuous loop. Rather than focusing on a single highlight, it delivers day after day of classic Glacier landscapes.
The Experience
Most versions of the North Circle Loop begin at Logan Pass or Many Glacier, depending on permit availability and shuttle logistics. Although when I did it, Many Glacier was closed, so we had to drive way up north to the Goat Haunt Trailhead.
Highlights include Ptarmigan Tunnel, Stoney Indian Pass, and Swiftcurrent Pass, each offering wide, dramatic views of surrounding peaks and valleys. Between passes, the trail drops into forested basins and along pristine lakes, creating a rhythm of climbing and descending that defines the route. Wildlife sightings are common, especially mountain goats, bighorn sheep, and occasionally bears.
Another reason I love The North Circle Loop is because it also gives you easy access to additional Glacier National Park highlights like Iceberg Lake and Grinnell Glacier Overlook.
What You Need to Know Before You Go
- Distance: About 50–55 miles, depending on variations
- Elevation gain: Approximately 10,000 feet
- Permits: Required for all overnight trips in Glacier backcountry
- Best season: Mid-July through early September
- Time needed: 4-6 days
Logistics & Planning Tips
This is active grizzly bear territory. Carry bear spray, know how to use it, and follow food storage regulations.
Camps fill quickly. Have backup itineraries ready when applying for permits.
Who This Hike Is Best For
The North Circle Loop is best for backpackers who want to see the best of Glacier in one scenic loop. You must be comfortable with multi-day travel, sustained elevation gain, and planning around permit availability.
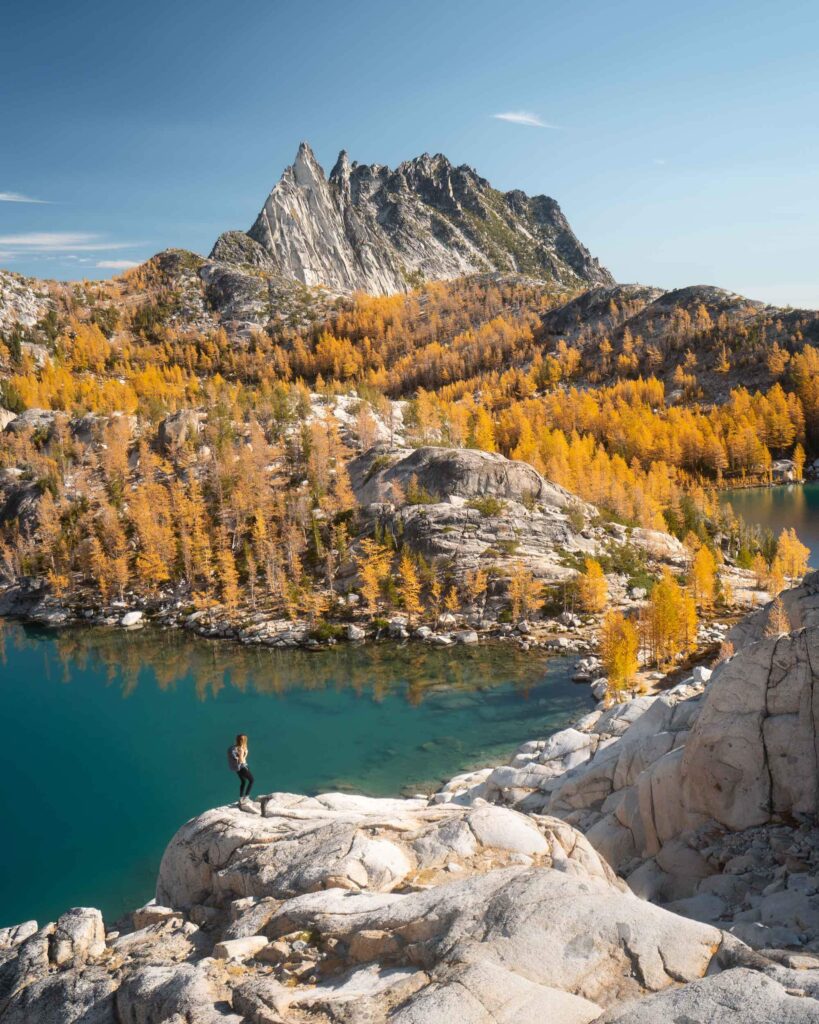
The Enchantments – Alpine Lakes Wilderness, Washington
Why This Hike Is Special
The Enchantments are one of the most iconic and sought-after hiking destinations in Washington, and for good reason. Jagged granite peaks, turquoise alpine lakes, and open high-country basins come together in a way that make it worthy of it’s name. It’s a landscape that looks more like the Sierra than the Pacific Northwest, and it stands out even in a region known for dramatic scenery.
The Experience
Most people experience the Enchantments either as a demanding one-day thru-hike or as a multi-day backpacking trip with permits. The classic thru-hike runs from Stuart Lake Trailhead to Snow Lakes Trailhead, climbing steeply through Aasgard Pass into the Core Enchantments before descending through Snow Lakes.
The climb up Aasgard Pass is the defining challenge of the route. It’s steep, loose, and relentless, gaining thousands of feet in about a mile. Once you crest the pass, the terrain opens into a stunning basin filled with granite slabs, tarns, and clear alpine lakes.
Above the pass, hiking becomes more about exploration than mileage. You move slowly across rock and alpine terrain, hopping between lakes and viewpoints. On the descent through Snow Lakes, the trail drags, but memories of the views above should keep you motivated.
A Shorter Alternative: Colchuck Lake
If you’re drawn to the Enchantments but don’t have a permit or the time for a full thru-hike, Colchuck Lake is the best “intro” version of the experience. Starting from the same trailhead, this out-and-back hike leads to a bright blue alpine lake beneath Dragontail and Colchuck Peaks.
At about 8 miles round trip with steady elevation gain, It’s still challenging, with steady climbing and rocky sections, but it skips the intensity of Aasgard Pass and the logistics of backpacking. If you want a taste of the Enchantments without going all in, this is the move.
What You Need to Know Before You Go
- Distance: 22 Mile Thru Hike
- Elevation gain: Approximately 5,000 feet
- Permits: Required for overnight trips in the Enchantments zone. Not required for single-day thru-hikes
- Best season: July through mid October
Logistics & Planning Tips
I recommend starting from the Colchuck Lake Trailhead and ending at the Snow Lake Trail Head, which means the bulk of the elevation is done in the first 6.5 miles. Aasgard Pass is by far the most challenging, steep section with a steep climb and false summits over 1 mile with a 2,000 ft elevation.
Most people choose to do this trail as a day hike because an overnight permit is required for the Core Enchantments between May and October. Overnight permits are distributed through a highly competitive lottery. The lottery opens in February for two weeks. As a day hiker, you will need a National Forest Recreation Pass, which is available at the trailhead for $5.
Despite the permit system, the area can feel busy, especially in peak season. Starting early helps a lot.
My favorite time to hike The Enchantments is during “larch season.” Larch madness happens during a small window, usually the first two weeks of October, when the larch trees transform from green to a stunning golden yellow.
Who This Hike Is Best For
Hikers who want to experience Washington’s most iconic trail!
Read my full guide to thru-hiking the Enchantments in one day here.
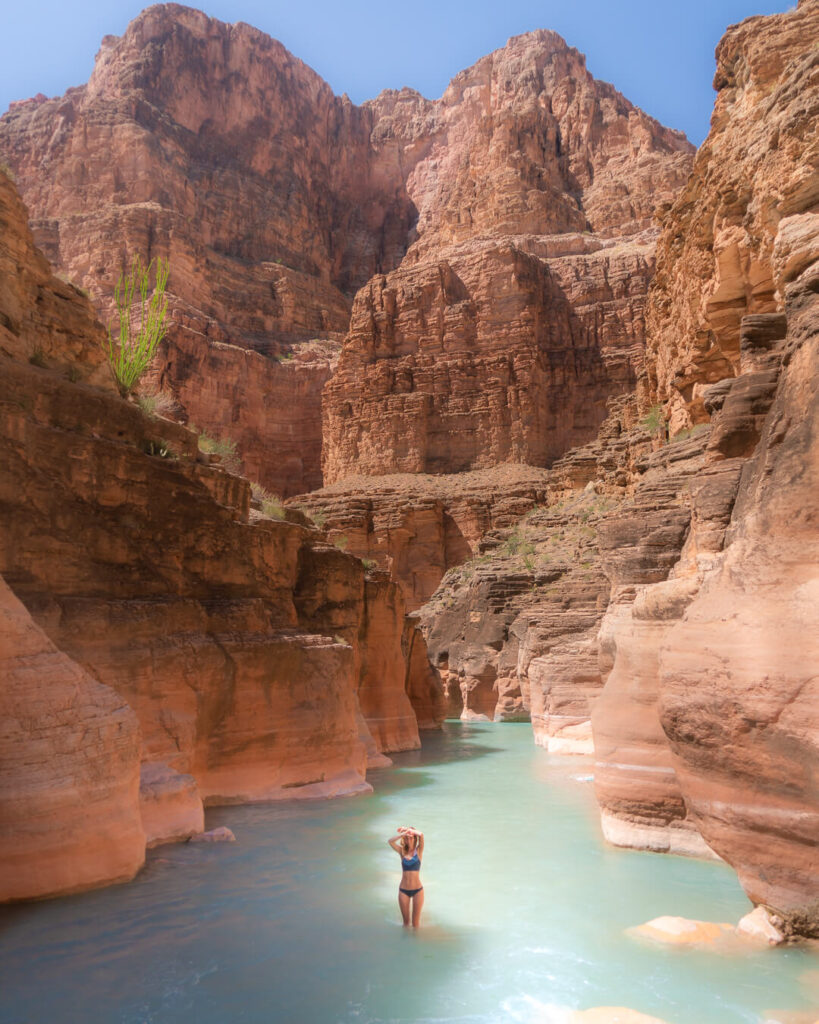
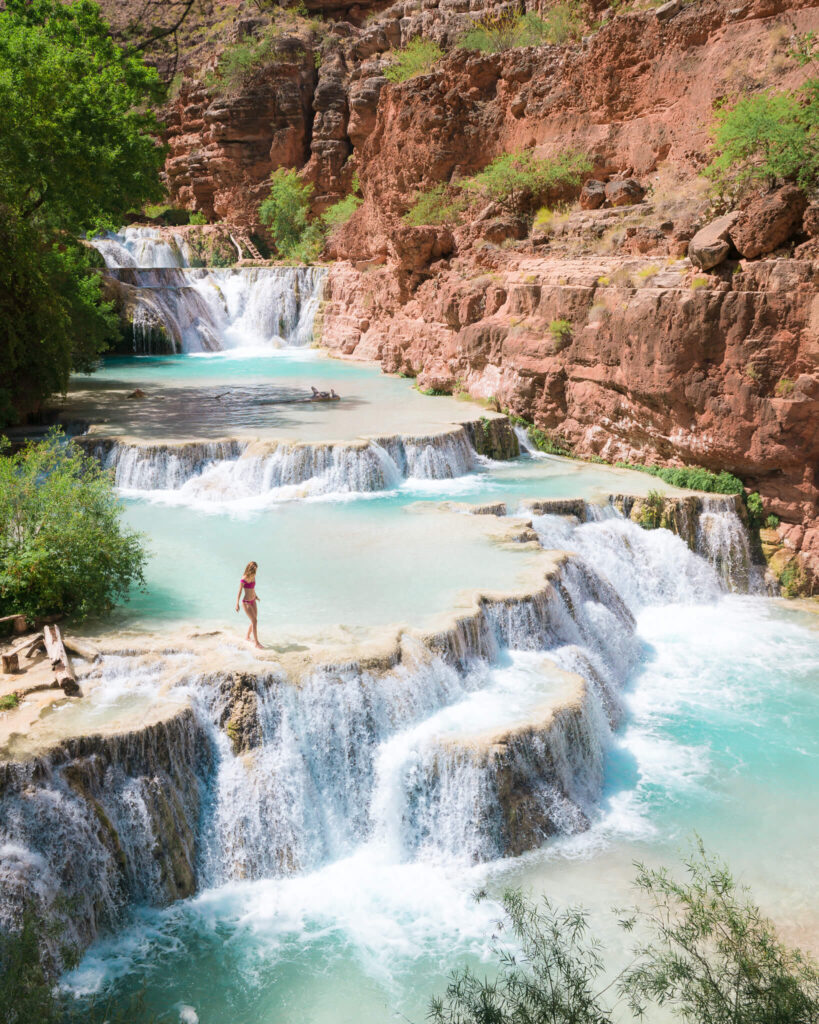
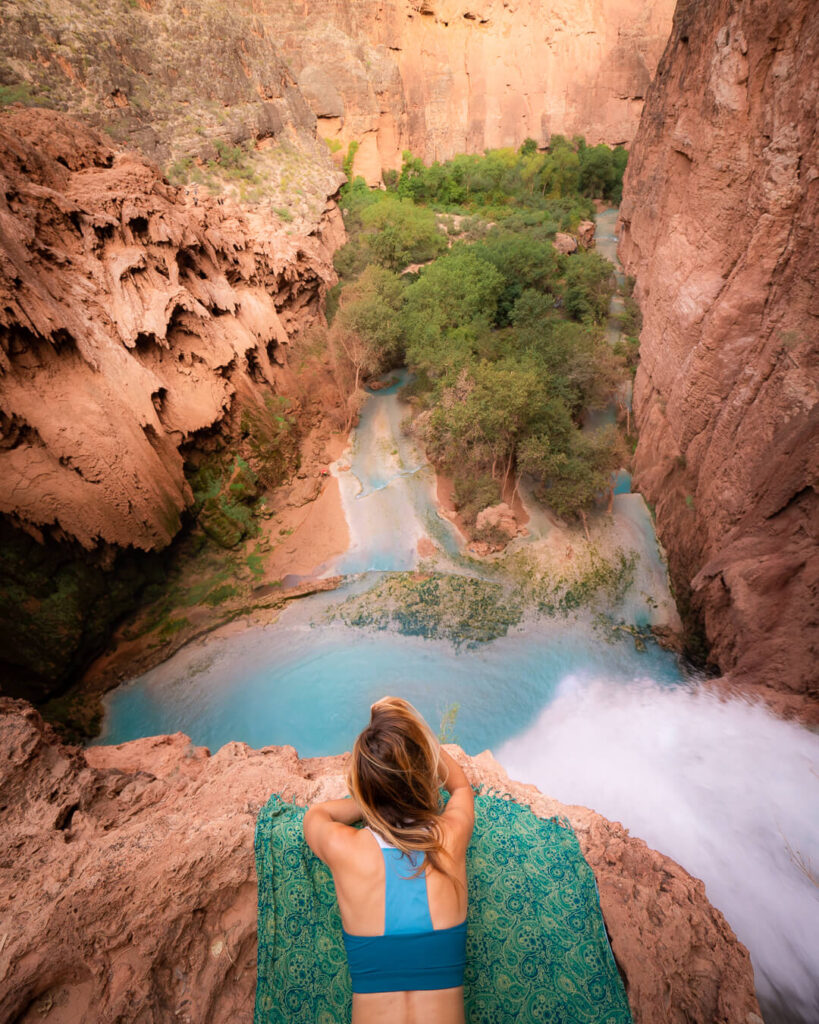
Havasupai Trail – Grand Canyon, Arizona
Why This Hike Is Special
The Havasupai Trail leads to one of the most visually striking waterfall systems in the United States. Deep inside the Grand Canyon, bright turquoise water cascades over red rock cliffs into a series of pools and falls that feel pretty unreal. The contrast between desert canyon walls and vivid blue-green water is what makes this place so unforgettable.
What sets Havasupai apart is that it’s not just one waterfall. Havasu Falls, Mooney Falls, Beaver Falls, and several smaller cascades are spread throughout the canyon, turning the hike into a multi-day immersion in one of the most unique landscapes in the Southwest.
The Experience
The hike begins at Hualapai Hilltop and immediately drops into the canyon via long switchbacks. From there, the trail follows a wide, sandy wash through open desert terrain before gradually narrowing as you approach Supai Village.
The first 8 miles are relatively straightforward, though exposed and hot in warmer months. Make sure to pack plenty of water and avoid mid-day. Once you reach Supai, it’s another couple of miles to the campground and main waterfalls. From that point you can set up camp, relax, or explore the other waterfalls.
Exploring beyond the campground toward Mooney and Beaver Falls involves ladders, chains, and steep descents, adding an adventurous element to the trip. You can even hike all the way down to the confluence with the Colorado River. The confluence is 16 miles roundtrip from the campground, but totally worth it!
What You Need to Know Before You Go
- Distance: About 20 miles round trip to the campground. Much longer depending on how many falls you hike to from there.
- Elevation gain: Approximately 2,400 feet (mostly descent and ascent)
- Permits: Required and extremely competitive and expensive
- Best season: March through May and September through November
- Time needed: You are required to pay for at least 3 nights
Logistics & Planning Tips
Getting a permit to hike to Havasupai Falls and camp in the canyon is required and very competitive because access is limited and demand is extremely high. You cannot hike to Havasu Falls, Mooney Falls, Beaver Falls, or anywhere inside the Havasupai Reservation without a valid reservation. They check, and they will turn you around when they catch you!
Permits are sold on the official Havasupai Reservations site: havasupaireservations.com. You must create an account ahead of time and be ready to log in when the sale begins. Permits cost about $455 per person for a 3-night stay.
The hike starts at Hualapai Hilltop, about a 4-hour drive from Las Vegas or Phoenix. The final stretch is on a rough road, but usually passable for most vehicles.
Havasupai is sovereign tribal land. Follow all rules, respect closures, and be mindful of local customs.
Who This Hike Is Best For
I’ve done Havasupai 3 times now, including as my very first solo-backpacking trip. The experience is ideal for hikers who are NOT looking for solitude, and are willing to navigate a competitive permit system in exchange for a truly unique waterfall experience.
While it has it’s downsides – price, crowds, heat. It’s a once-in-a-lifetime experience that makes it worthy of a spot on this US hiking bucket list!
Sahale Glacier Camp – North Cascades National Park, Washington
Why This Hike Is Special
In my opinion Sahale Glacier Camp is the quintessential North Cascades hike. The sharp ridgelines, and stacked layers of mountains creating depth that sets this area apart from other mountain ranges in the West.
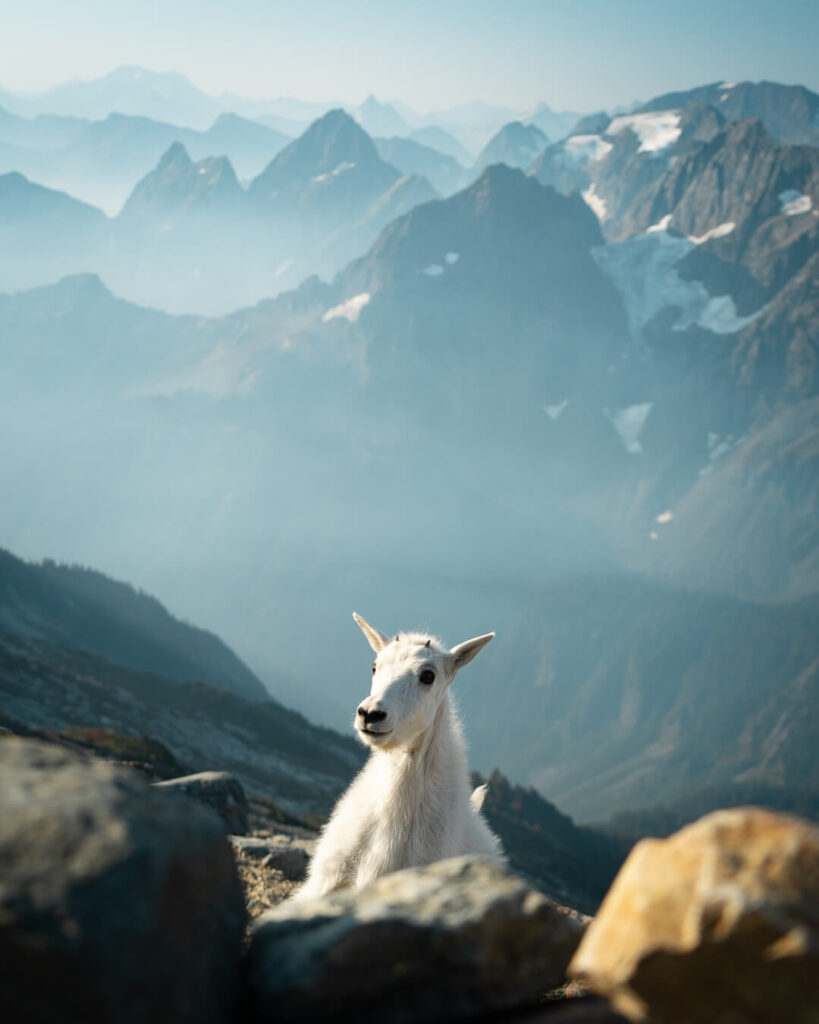
It’s also home to one of the most incredible backcountry campsites in Washington. Camping high on Sahale Arm, surrounded by glaciers and peaks, is a rare experience and an easy reason why permits are so competitive. Mountain goats are frequently spotted along the route, adding to the feeling that you’re deep in true alpine terrain.
The Experience
The hike begins at the Cascade Pass Trailhead, one of the most scenic starting points in the North Cascades. The trail climbs steadily through forest and wildflower meadows before breaking out into open alpine terrain near Cascade Pass – a popular day hike in it’s own right.
From there, the route continues up Sahale Arm, where the landscape changes quickly. Trees disappear, granite slopes take over, and views open in every direction. The final push up a scree field is exhausting, but the views make it all worth it.
What You Need to Know Before You Go
- Distance: 12 miles RT
- Elevation gain: Approximately 4,400 feet
- Permits: Required for overnight camping.
- Best season: July through September
Logistics & Planning Tips
Overnight stays at Sahale Glacier Camp require a backcountry permit through North Cascades National Park. Reservations are quota-based and competitive during peak season.
If you can’t secure one of the coveted camping permits, the route still works as a challenging but very doable day hike, making it accessible to strong hikers who want a true North Cascades experience without committing to an overnight trip.
Mountain goats are common in this area, especially at camp. Give them plenty of space and protect your gear, as they’re known to investigate salty items. I also saw a bear on the trail once, so stay bear aware.
Who This Hike Is Best For
Sahale Glacier Camp is an ideal introduction to the North Cascades. You should expect sustained elevation gain and alpine terrain. It’s a great option if you want big mountain scenery without technical climbing, whether as a demanding day hike or a fairly casual overnight trip.
Find more of my favorite Washington hikes here.
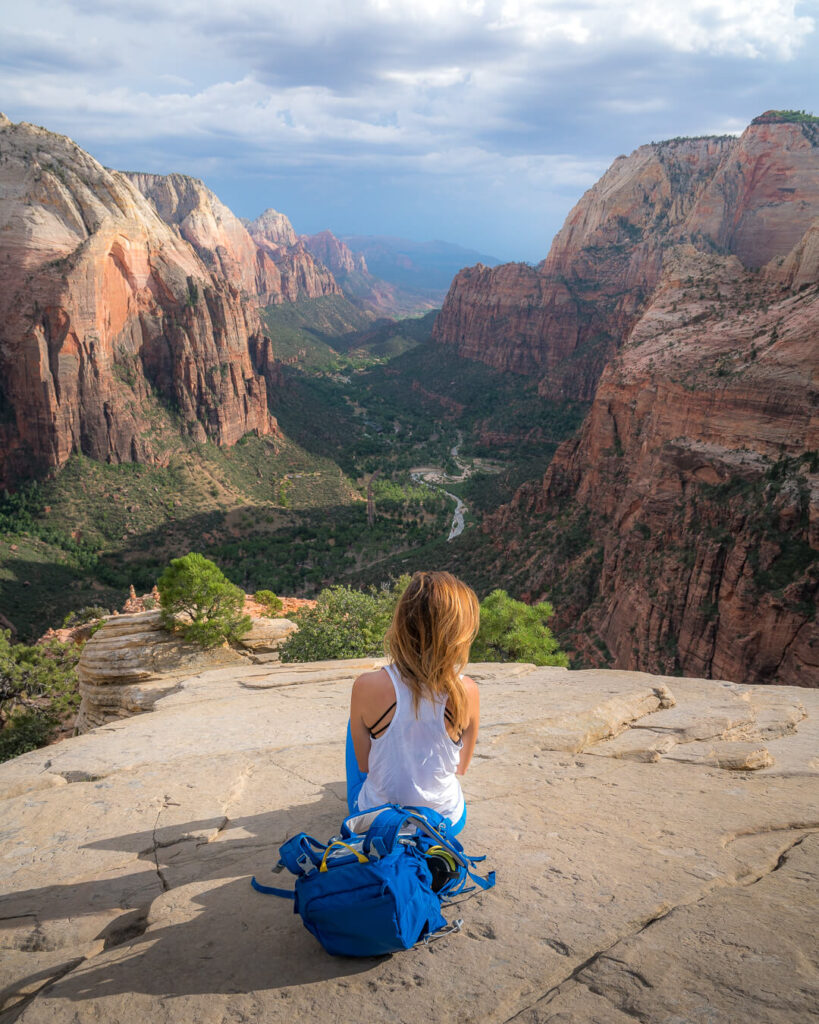
Angels Landing – Zion National Park, Utah
Why This Hike Is Special
Angels Landing is one of the most iconic hikes in the United States, and it earns that reputation. Perched high above Zion Canyon, the final summit offers a 360-degree view of red rock walls, the winding Virgin River, and the massive canyon far below. Few hikes combine accessibility and exposure in quite the same way.
The Experience
The hike begins at the Grotto Trailhead and follows the West Rim Trail through shaded canyon sections before climbing steeply up Walter’s Wiggles, a famous series of tight switchbacks. From there, the trail continues along a ridge to Scout Lookout.
At Scout Lookout, hikers without permits must turn around. Those continuing climb the final half-mile along a narrow spine of rock, using chains for balance and support. In places, the trail is only a few feet wide with steep drop-offs on both sides. This section is often a struggle for people with a fear of hights, but I honestly think it’s reputation is a lot worse than the reality.
The final summit is surprisingly broad and makes a great place to rest and take in the view. From here you’ll enjoy what I honestly think is one of the United State’s single best views.
What You Need to Know Before You Go
- Distance: 5.4 miles round trip
- Elevation gain: Approximately 1,500 feet
- Permits: Required
- Best season: Spring and Fall
Logistics & Planning Tips
Angel’s Landing requires a permit through Zion National Park’s lottery system. There are seasonal, day-before, and last-minute options, but demand is high. If possible allow for some flexibility with scheduling.
During peak season, private vehicles are not allowed in Zion Canyon. Use the park shuttle to reach the Grotto stop. Along this note, if you are planning on hiking Angel’s Landing for sunset be aware of when the last shuttle leaves Grotto Trailhead or you’re going to end up hiking A LOT farther than you planned on.
Who This Hike Is Best For
Angels Landing is best for confident hikers who are comfortable with exposure and steep drop-offs. That being said, I really think anyone could do it!
John Muir Trail – Sierra Nevada, California
This Hike Is Special
The John Muir Trail is one of the most iconic long-distance hikes in the world, tracing a high route through the heart of California’s Sierra Nevada. Passing through Yosemite, Kings Canyon, Sequoia National Park, and the Ansel Adams Wilderness, it connects some of the most dramatic alpine landscapes in North America in a single continuous journey.
The Experience
Most hikers travel southbound from Yosemite Valley to Mount Whitney, though northbound hikes are also common. Days settle into a steady rhythm of early starts, long climbs over high passes, and afternoons spent beside lakes and streams.
The terrain is consistently beautiful but rarely easy. Nearly every day involves significant elevation gain and loss, often over passes like Forester, Mather, and Glen. While the trail is well-maintained and clearly marked, the altitude and cumulative fatigue become major factors as the miles add up.
What You Need to Know Before You Go
- Distance: About 220 miles including the hike down from Whitney Portal
- Elevation gain: Approximately 47,000 feet total
- Permits: Required
- Best season: July through September (snowpack dependent)
- Time needed: 2-4 weeks
Logistics & Planning Tips
Logistics for the John Muir Trail are a bit complicated, to say the least. Permits, resupplies, and packing all require careful planning. If you are serious about hiking the John Muir Trail (which I highly recommend) I’d start with my Complete Guide and Trail Notes from my two week John Muir Trail experience. I also have a post detailing what I packed, and what I’d leave behind next time.
Who This Hike Is Best For
The John Muir Trail is best for experienced backpackers looking for an intro to long distance through hiking. It’s not well suited for beginners or anyone looking for a casual backpacking experience.

Half Dome – Yosemite National Park, California
This Hike Is Special
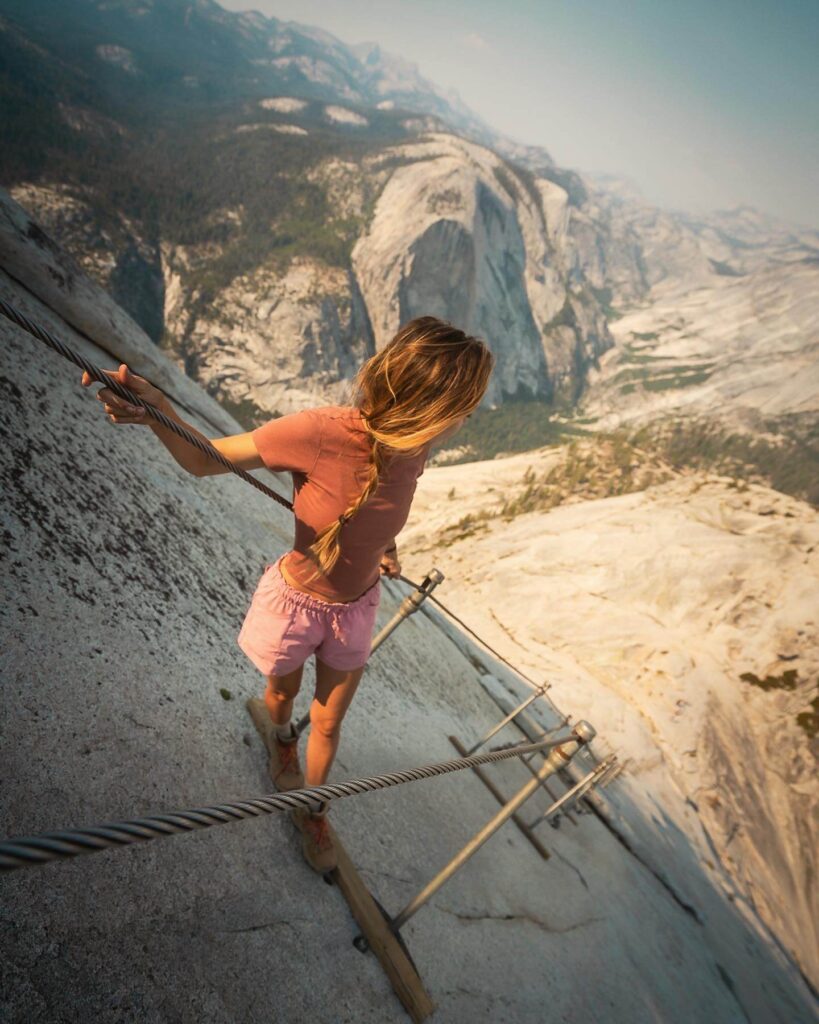
Half Dome is one of the most recognizable natural landmarks in the United States, if not the world, and standing on top of it feels like stepping into a photograph you’ve seen your entire life. Rising nearly 5,000 feet above Yosemite Valley, it dominates the skyline and draws hikers from around the world.
The Experience
The hike begins in Yosemite Valley, most commonly at the Happy Isles Trailhead. From there, the trail follows the Mist Trail past Vernal and Nevada Falls, where spray from the waterfalls often cools hikers on warm days.
Beyond Nevada Falls, the trail becomes more gradual as it winds through Little Yosemite Valley and subalpine forest. The final approach climbs steeply up granite slabs toward the base of the cables.
The cable section is what defines the hike. Two steel cables are anchored into the rock, allowing hikers to pull themselves up the final 400 feet of steep, exposed granite. Wooden planks provide occasional footing, but much of the ascent requires careful movement and patience. This section can be slick and very dangerous when wet.
At the summit, the space opens into a broad granite platform with sweeping views of Yosemite Valley, the High Sierra, and distant peaks.
What You Need to Know Before You Go
- Distance: About 14–16 miles round trip (depending on route)
- Elevation gain: Approximately 4,800 feet
- Permits: Required for the cable section
- Best season: Late May through October (weather-dependent)
Logistics & Planning Tips
Access to Half Dome’s cable route requires a permit, which is issued through a lottery system on Recreation.gov. There is a preseason lottery that opens in early spring, as well as daily lotteries during the hiking season for any remaining spots. I’ve found that one of the easiest ways to get Half Dome permits is to include them on other backcountry trips that travel through this area.
Starting early is key for this hike. Most hikers begin before sunrise to avoid afternoon heat, thunderstorms, and heavy crowds at the cables. Weather plays a major role in safety on Half Dome. The cables should never be attempted in rain, storms, or when ice is present, as wet granite becomes extremely slippery. Always check the forecast carefully and be prepared to turn around if conditions change.
Good footwear with solid traction is essential, especially on the granite slabs near the summit. Many hikers also bring lightweight gloves to improve their grip on the cables. Because this is a long and physically demanding hike, carrying enough water, and food is critical. There are limited reliable water sources past Nevada Falls, so plan accordingly.
Who This Hike Is Best For
Half Dome is best for strong, confident hikers who are comfortable with long distances, steep climbs, and exposure. I’m not a big fan of telling people what to do, and in general I’m a big believer that with the right attitude almost anyone could complete all of the hikes on this list. BUT Half Dome probably isn’t for you. Panicking on the cables could be extremely dangerous not only for you, but for other hikers as well. Not to be dramatic, but people have died.
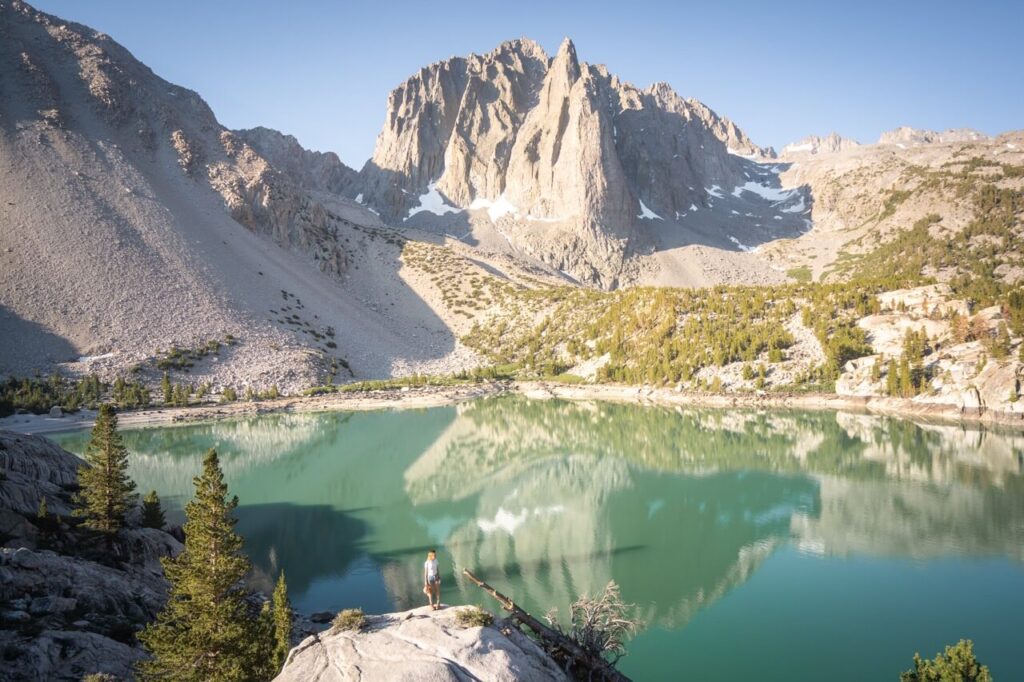
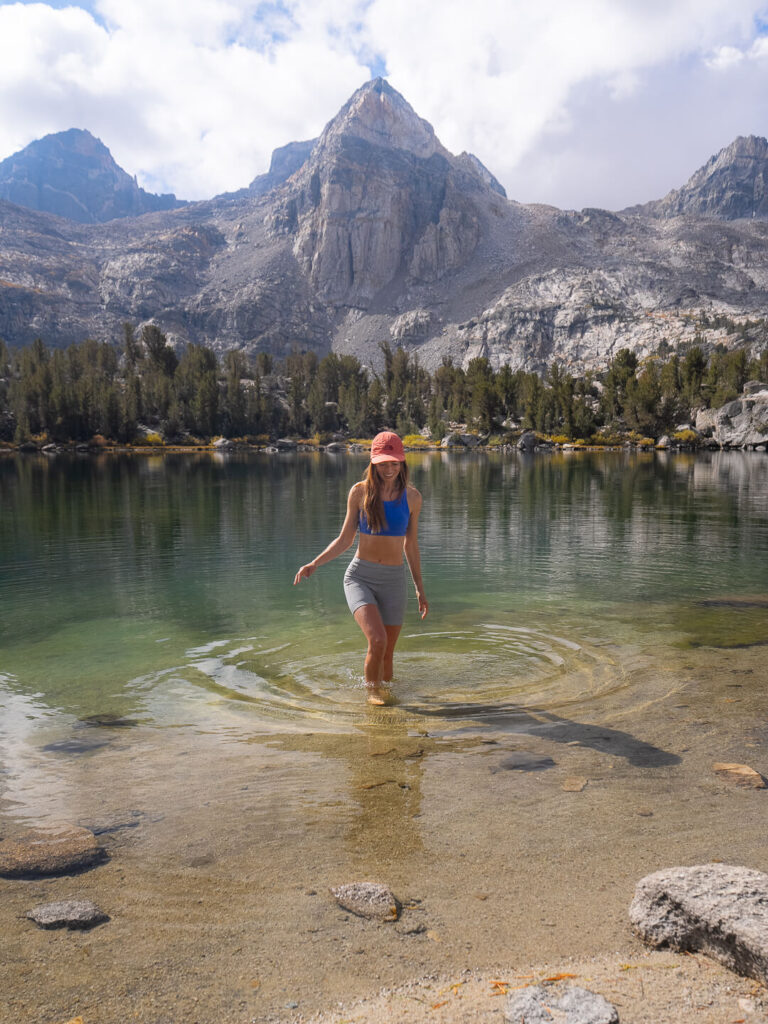
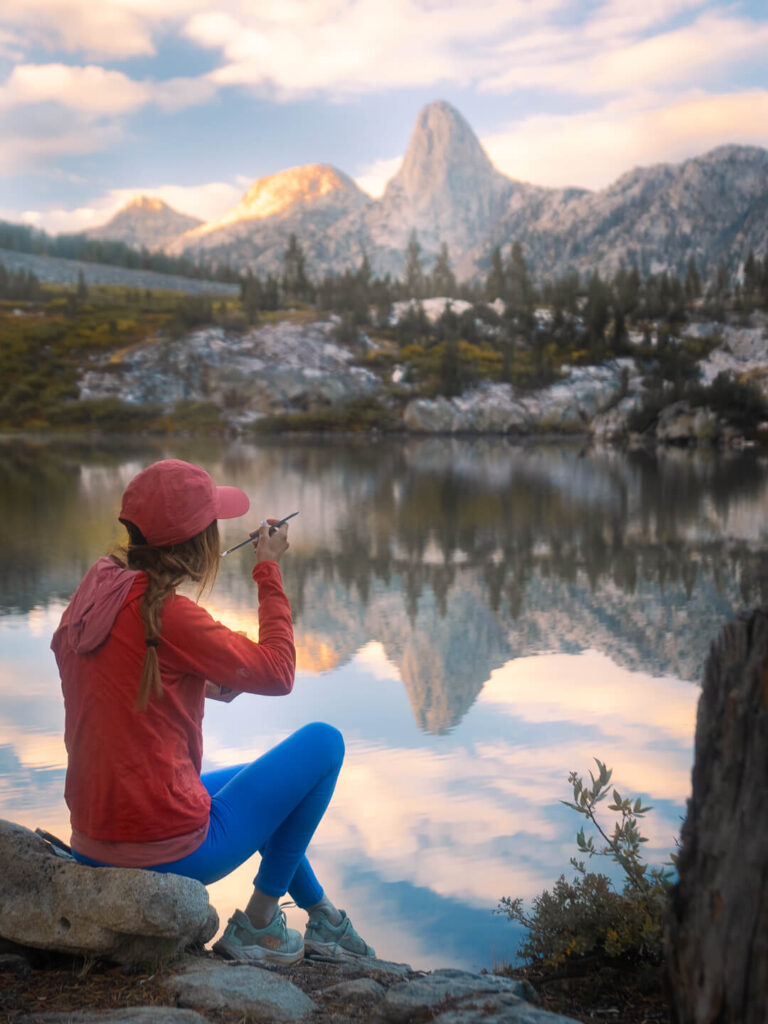
Big Pine Lakes – Eastern Sierra, California
This Hike Is Special
Big Pine Lakes offers one of the most accessible alpine lake chains in the Sierra Nevada, with a series of bright turquoise lakes set beneath glaciers and jagged peaks. For me, one of the things that makes this hike stand out is the variety packed into a relatively short distance. In one outing, you move through forest, past waterfalls, alongside glacial streams, and into a high basin filled with multiple lakes, each with its own character.
The Experience
The hike begins at the Big Pine Creek North Fork Trailhead near the town of Big Pine. From the start, the trail climbs steadily through open forest and along rushing creeks, with regular views of Temple Crag and surrounding peaks.
As you gain elevation, the terrain becomes rockier and more open. The trail splits and reconnects several times so you do want to pay attention to where you’re going!
First, Second, and Third Lakes are the most commonly visited, with Fourth and Fifth Lakes offering quieter alternatives if you’re willing to continue farther, which I personally haven’t had the opportunity to do. Yet!
Read about my experience at Second Lake plus detailed trail descripton!
What You Need to Know Before You Go
- Distance: Approximately 10 miles RT to Second Lake
- Elevation gain: Approximately 2,300 feet
- Permits: Required for overnight trips. Not required for day hikes.
- Best season: Late June through October
Logistics & Planning Tips
Overnight trips to Big Pine Lakes require a wilderness permit through Recreation.gov (Inyo National Forest – Wilderness Permits), while day hikes do not, which makes this one of the most popular trails in the Eastern Sierra. Backpacking permits are limited and often sell out, so plan in advance if possible.
The hike begins at the Big Pine Creek North Fork Trailhead off Glacier Lodge Road near the town of Big Pine. Parking fills very early in peak season, often before sunrise, so plan accordingly. Continuing past the lower lakes is the best way to find slightly quieter spots.
Who This Hike Is Best For
Big Pine Lakes is perfect for day hikers and beginner backpackers looking for a day at some of the pretties lakes in the region. It’s a great choice if you want classic Sierra landscapes in a manageable distance, but it’s not the best option if you’re seeking solitude during peak season.
Everything You Need To Complete The Best Hiking Trails I
Whether you are heading out for a quick day hike or something a little more ambitious, the right gear can make the whole experience smoother and way more enjoyable. This is the setup I’ve been using lately out on the trail, including the pieces I reach for again and again because they actually work in real conditions.
DON’T FORGET! You should always carry The TEN ESSENTIALS for outdoor adventure with you. They might just save your life!
Packing & Organization
BACKPACK – The Osprey Eja (women’s) and Exos (men’s) are great packs for hikers who want to lighten their load but aren’t ready to give up comfort and support. They’re heavier than cottage ultralight packs, but that extra weight gives you a sturdy frame, excellent ventilation, and a suspension system that keeps heavy loads feeling comfortable over long days. And it’s still much lighter than a more traditional pack with all the bells and whistles.
Shelter and Sleep Gear
SLEEPING BAG – The Feathered Friends Egret UL 20 has been my go-to sleeping bag for the last two seasons because it’s lightweight, insanely warm for its weight, and compresses small enough to save space in my pack.
SLEEPING PAD – As a side sleeper, I’m picky about sleeping pads, and the NEMO Tensor Trail Ultralight Insulated Sleeping Pad is one of the only ultralight pads I’ve found that’s genuinely comfortable (for a sleeping pad). After years of use, it’s proven reliable and worth every ounce.
BACKPACKING PILLOW – The Sea to Summit Aeros Premium Pillow is the best ultralight pillow I’ve found. Does it feel like your pillow on your bed at home? NO. But, it’s still one of those little luxuries I never regret packing.
TENT (TWO PERSON) – The Big Agnes Copper Spur UL2 has been my go-to backpacking tent for years because it’s roomy, ultralight, and incredibly reliable. It’s also a true freestanding tent, which means it can stand on its own without stakes — a huge advantage when camping on rocky terrain or spots where staking isn’t easy.
Food, Water, & Kitchen Gear
ULTRALIGHT STOVE – I recently swapped my Jetboil Flash for the Soto WindMaster with 4Flex pot supports because it’s lighter and more versatile. You can use different pots, not just the Jetboil mug.
COOK POT – The TOAKS Titanium 750 ml Pot, perfectly fits a 110g Fuel Canister (the smaller standard size that you see), WindMaster Stove, and a mini BIC Lighter.
EATING UTENSIL – The Snow Peak Titanium Spork (Long)
WATER PURIFIER – The Katadyn BeFree is my favorite filter for speed and simplicity. It’s ultralight, easy to squeeze, and perfect for quickly filling bottles on the go.
The Grayl Water Filter is much heavier but unbeatable for international travel or areas with questionable water sources because it removes viruses as well as bacteria and protozoa. It works like a French press—fill, press, and drink—with no need for extra bottles or gear.
FOOD STORAGE (BEAR SAFE) – The BearVault BV450 Jaunt Bear Canister. This size is generally considered good for 4 nights, or 2 night trips with 2 people.
The Ursack is a lightweight alternative to a bear canister. It’s made from bulletproof-grade fabric that resists chewing and clawing, and it’s much easier to pack in your bag. You’ll still need to tie it to a sturdy tree, and it doesn’t protect your food from getting crushed, but for trips where bear canisters aren’t required but you still want to protect your food from bears and other critters.
Other Backpacking Gear
HEADLAMP – Nitecore NU25 400 Lumen Rechargeable Headlamp
GPS COMMUNICATION – I carry the Garmin InReach Messenger Plus for peace of mind on backcountry trips — it lets me send texts and share my location even when there’s no service. The battery lasts for days, and it’s a small, reliable way to stay connected and safe when I’m off the grid. AND you can send photos and voice notes! Watch the video I made about the Garmin Messenger Plus!
SMART WATCH – I’ve been wearing the Garmin Fenix Watch to track my activity for years. Plus it’s so fun reviewing and sharing hike details after!
TREKKING POLES – Durston Iceline Trekking Poles. I just picked up the Durston Iceline trekking poles because I wanted something ultralight but sturdy to take pressure off my knees on big hikes. They’re incredibly light (under 10 oz per pair) and designed for strength.
MULTI-TOOL – Swiss Army Classic Knife
FIRST AID – Band-Aids, Leukotape, pain killers, anti-bacterial cream.
REPAIR KIT – Repair Spool by Igneous, Tenacious Tape.
POWER BANK – Nitecore Power Bank
Clothing Essentials
SUN SHIRT – The Crater Lake Hoody is my favorite sun shirt because it’s so light and soft it almost feels like air. It offers full UPF 50+ protection for long days in exposed terrain, so I don’t have to carry buckets of sunscreen.
SHORTS – You don’t need to reinvent the wheel here. Whatever works for you! This summer I’ve been really enjoying the Lululemon Pace Rival High Rise Shorts and Outdoor Voices Warmup 5” Shorts.
HIKING PANTS – To be honest I’ve never been a big hiking pants person. I generally just wear one of my favorite pairs of leggings, because that’s what I’m most comfortable in. But this summer I picked up a pair of REI Trailmade Pants and they were nice! The Trailmade Pants are affordable, durable, and surprisingly versatile for hiking and backpacking. And I have to admit it was nice to have pants that felt a bit more airy than leggings.
INSULATED LAYER (Down Jacket ) – The Patagonia Fitz Roy Down Jacket is a cold-weather essential I bring on alpine or winter trips when serious warmth is non-negotiable. It’s stuffed with premium 800-fill down, so it’s incredibly warm for its weight. I’d recommend sizing down.
When I’m really trying to go lighter without sacrificing warmth it’s hard to beat Rab’s Mythic G Down Jacket. Best to pick this one up on sale if you can!
RAIN JACKET: The Rab Phantom Jacket is an ultralight, fully waterproof shell that packs down small and disappears in your bag until you need it. I’m a fair weather hiker, but in the mountains weather can change fast, so it’s great to have rain protection that doesn’t weigh me down.
For more inclement whether, when I want something a little more substantial, I use the Arc’Teryx Beta SL Jacket.
Shoes
TRAIL RUNNERS – The Hoka Challenger Trail Running Shoes are my go-to shoe for warm weather hiking. I prefer trail runners over hiking boots because they’re lighter, more breathable, and dry quickly. I’ve worn mine on everything from day hikes to multi-day trips like the John Muir Trail, and they’ve been incredibly durable for how lightweight they are.
BOOTS – The Danner Inquire Chukka Mid is my all-time favorite hiking boot! I wear it when I want more ankle support than a trail runner but still need something light and flexible.
Camera
SONY RX100 VII – The Sony RX100 VII is my favorite compact camera for backpacking because it’s small enough to slip in a pocket but still delivers professional-quality photos. The 24–200mm zoom range makes it incredibly versatile, and it’s the perfect option when I don’t want to carry one of my heavier cameras but still care about image quality.
| Just a quick heads up. Some of the links in this post are affiliate links, which means I might earn a tiny commission if you decide to make a purchase. It does not cost you anything, but it’s one of the simplest and most supportive ways to help me keep creating these guides. I’m not paid to recommend anything, and every opinion here comes from real experience with gear I actually use and love. If you’re planning on picking something up, using my link truly makes a difference and I appreciate it more than you know. |
The Best Hiking Trails in the US
I hope this list has given you plenty of inspiration to get outside and explore the miles of trails that your county, state, and country has to offer.
Make sure you’re prepared with good hiking shoes, the appropriate equipment, and the safety knowledge needed for the outdoors and the area.
Check out my Outdoor Gear Guide for backpacking, hiking and camping as well as my gear check list to help you prepare to tackle these epic hikes.
Please remember to enjoy the outdoors responsibly, leave no trace, and leave the outdoors better than how you found it.
Which of these US hikes are you adding to your bucket list?
Like this post? Pin it for later and share it with others!